Posts

Mass Producible Object Results

Image
I ended up making four versions of the tie. The first two prototypes were the ties on the left in each image while the ties on the right are the revised versions. For the plain tie, the biggest change ended up being the way I cut the wood. I wanted it to look more intentional when the grain changed directions, which was my issue with the first version. I also increased spacing between each slot, as suggested by Bryan. With the engraved set, I ended up using watercolor paint to give it a sort of wash. This helped cover up some staining caused by the laser cuter. The second version I used a mask over the whole thing, but that ended up having a lot harder of a time engraving it. The wood was cleaner (although I will admit the bookstore provided me with the wrong type of wood, so it ended up way lighter than intended, even with a watercolor wash). I tried it on and the length of it fits really well with the length of my torso. The weight of the tie didn't pull off the glued clasp eithe...

Mass Producible Object

Image
I ended up assembling the ties using PH neutral PVA glue. I've used it before for bookbinding projects and it holds up well, and it seems to be the recommended glue for attaching fabric to wood. It's also flexible when dry, which is an added bonus.  For the Alder, I found that it glued great and caused no issues with discoloration. When I glued it down to the canvas, I didn't bend it before the glue dried so the seams were very minimal, however it bends a lot less. With the birch plywood, I would crack the seams which made it much more flexible. One downside of the engraved plywood was the stains caused by the soot (I had no resist on it due to the engravings). To fix this, I used watercolor paint to restore the color by putting a layer on top and wiping away the excess water. When researching good glues for metal (as that's what the clasp is made of), it was typically suggested to use an epoxy glue, such as Gorilla Glue. I still have yet to attach this because I am coa...

Mass Producible Object - First Cuts

Image
My processes for this week mainly focused on making the actual objects. I ended up cutting both the plywood and the canvas on the Trotec laser cutter.  With the canvas, I was only cutting the outline so it gave me a good idea of the scale before I committed to laser cutting the wood. For the plain tie, I used 5mm solid wood alder and for the engraved tie, I used 2.5mm birch plywood. Due to the size of the tie, I had to break it up into multiple pieces to fit onto one sheet of wood for both versions. Since I was engraving with two "shades," I also cut & engraved a little coin that was the logo on the knot of the tie as a quick test piece These are my results for the laser cuts/engravings: Next week is my one-on-one with Bryan to check in with this project. I will also have to assemble the pieces together, so I'll need to figure out what sort of glue to use to hold the wood and canvas together. Another thing I am thinking about is longevity, so my next step is to apply ...

Mass Producible Object - Initial Progress

Image
So far, I have worked on designing the general shape for the laser cuts and a potential design for engraving. I want to start off with a test piece made up of only cuts lines before I proceed with the laser engraving. I considered retrying the living hinge for this project, but I feel as though a tie will be too narrow of a design to truly utilize it. (Additionally, I would have to find a piece of wood that is long enough which may be an issue if I buy square sheets of wood.) By cutting them into segments, it means I can rearrange them to whatever fits best to whatever size wood sheets I'll use. (This is particularly important because the sheets sold for the laser cutter are only available up to 12 inches long.) I figured that a good length would be between 18-20 inches in total, including the "knot". (This measurement is based roughly on the distance between my shirt collar and my belt line.) For the segments, I spaced them out 1 inch apart. In terms of material, I am co...

Project 2 - Mass Producible Object Proposal

Image
For project two, I want to expand on my current project, but I think that I should finish it up closer to the end of term.  I dramatically redesigned the edges to contain straight edges so that they are easily stackable and portable, like an Ikea shelf would be. In terms of naming it as a product, I would advertise it along the lines of "geometric dragon bookshelf" because I want to keep the name relatively literal. I ended up making a lot of progress on redesigning the bookshelf to be cut exclusively on the CNC machine. I was pretty torn over designing the curved shelves, so I approached it with the intent of using only straight boards with diagonal cuts. Until then, I'd like to work on a project that is relatively small scale but will still take up the rest of my semester.  When considering mass-production, the first thoughts that come to mind is something that can appeal to an audience. So for this project, instead of making an object designed for myself, I want to cre...

OBDF 311 March Update

Image
I tried making a lattice hinge on the CNC machine. I've found three main issues with doing this. The first is that it was very time consuming for the process. The two tests I've done so far have taken about 30-45 minutes each, which is something I hope can be resolved by using the large scale CNC machine. The second issue was my designing process. I looked at images of similar lattice cuts without really understanding how the spacing should work. I knew that I would be cutting with an 1/8 drill bit, so I tried to space out my pieces according to that but I ended up putting the cuts too far apart for the wood to actually bend.   The last issue I found was that it was too small of a piece to really put towards the test. I did find that there was a little bit of bend but not nearly enough that I was looking for.  For this upcoming class, my plan is to use the laser cutter to do a few more tests, in hopes that the machine will be a lot faster to use. I'm trying to mimic the c...

OBDF 311 Reading Week Update

Image
Most of the work I did this week was setting up the CNC machine. Quite a few of the settings required quite a bit of tinkering. Results: I found that one of the kerfs broke upon bending. I also found that the bend was not that gradual, and this may be an issue of size (being such a small model/test piece) Moving forward, something I want to try is switching to bending using a straight lattice hinge (sometimes also referred to as a "living hinge"): I did briefly look at other types of lattice patterns, but I found that since I am only trying to bend in one direction, this may prove to be the most sturdy for what I am doing. Typically, these are done using a laser cutter and I am thinking that with how my progress is currently going, I may want to switch to doing this project entirely with the laser cutter instead of going larger scale. It was a bit of an ambitious project in the first place, but I have also noticed that most of the items I wanted a place to store in the first ...

OBDF Week 4 Update

Image
For cutting out the shapes, my plan is to use the laser cutter and for the kerfs, I will use the small 8" x 8" cnc machine in the thing tank.

OBDF 311 Project 1 - Update #2

Image
Design updates from last model: I decided that the horns and scales of the dragon should just be part of the backing to simplify the process of adding those attachments. I figured that there will be some waste due to the odd shape of the backing anyways and that it would use up less material than trying to bend those curves considering it is not meant to be usable shelf space. The outlines are caused by an engraving in the center parts of the horns and the center of the back spikes. (The outline was offset and then engraved about 1/3 of the material deep.) Note: the color here is just for display purposes because I found that using the "white paint" didn't provide enough contrast between background and object I was thinking of making a 1/3 scale mock-up using cheap 1/4in plywood. Before I buy it. I want to check out the size of the small scale CNC machine in the thing tank so I know the dimensions I would need to cut a large sheet into. (If I buy my supplies at home depot...

OBDF 311 Project 1 Model

Image
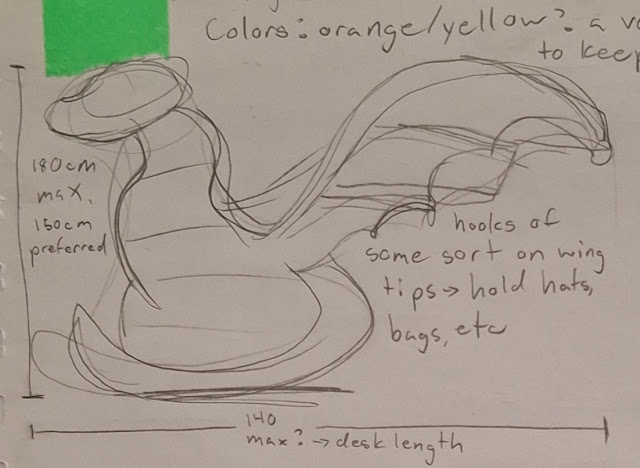
 Project 1 Update: One of the largest concerns was the bookshelf falling over due to weight on the wing, Before I started modeling this project, I ended up giving my dad a call because he's a carpenter that happens to have experience with making furniture and bookshelves. Based off my initial sketches, he asked me about the side profile of the bookshelf.  Originally, I said it was going to just be a regular rectangular side profile, but he encouraged me to give the dragon a "belly" that sticks out, along with a bit of a rounded head shape. The idea with the belly was that the corners of the shelves were rounded. I didn't want to go too wild with this since my intentions for the bottom shelves are particularly are holding rectangular shapes (books) but I did fillet each corner of the shelf that sticks out. To help with concerns of stability, he told me that the weight of the wing wouldn't be a concern as long as the bottom two shelves are the thickest. The rough nu...

OBDF 311 Project 1 Proposal

Image
The first project this semester is "The Bespoke Object." Bespoke meaning either custom-made or specially made for a particular person. As the person who is keeping this object, this led me to thinking about objects that would be able to live in my space, particularly my home, comfortably. So my concept for this project is a dragon shaped bookshelf. Currently. I have a lot of books that are being stored in a box under my bed but I am very particular about shelf space, especially since I want a space for some of my larger sketchbooks. The dragon part of the concept came from the idea of hoarding. And since I was on the idea of hoarding, I think it'd be good to have a lot of shelf space that has the potential to hold other odd shaped items, such as plushies and small craft items. Initial sketches: My initial sketch was looking at the rough shape this would take, as I want this to be the sort of bookshelf that can stand alone rather than be wall-mounted. (This meant that the ...